Dome Light
PARTS REAR CAPT SIDE
The back wall (back wall) of the Capt I is composed of following parts:
- Dome light with opbouwblokje back;
- Circuit breaker panel, P18-1 (Nav);
- Circuit breaker panel P18-2 (Inst & Comm);
- Circuit breaker panel, P18-3 (Anti-Ice, & Lighting);
- Head phone dummy panel;
- Development with housing for cup holder and ashtray;
- Cup holder and ashtray;
- Ad Grimes light;
- Flashlights with holder;
- Dummy ‘observer seat’ with pillows, pad holder and ‘safety belt’;
- Maphouder;
- Amp-stickers-CB";
- Decals with panelnummering and inscriptions;
- Circuit breaker button caps;
- Nis with upper rail window P2’;
- Ad " upper rail window P2’.
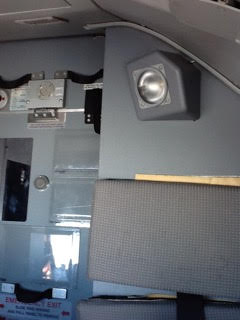
The real Dome Light
DESCRIPTION
Against the back wall (rear bulkhead of the cockpit, one can find left and right 2 lamps for the interior lighting (Dome Lights).
They are used at the entry to the cockpit when it's dark or for lighting to give a briefing among the pilots ...
The left-hand lamp has a white half spherical enclosure or shade. The real version is equipped with 2 ‘bulbs’ which will be a big and a small ‘bulb’. The large ‘bulb’ is used in normal circumstances. The little ‘bulb’ is only used when the aircraft power loss and which the Emergency Lights switch is turned on or active.
De other ‘Dome Light’ on the right side is located above the ‘jump seat’. This ‘Dome Light’ has more of a transparent spherical cap. This "Dome Light" is mounted on an angled structure or protrusion of the back wall.
In normal circumstances, the ‘Dome lights’ with power by the ‘Battery Bus’ (not the ‘Hot Battery Bus’) i.e. first the "battery" switch on the " On " for that you get the Dome Lights to turn on.
This is done through a 3 position switch on the Aft Overhead (Dim - Off – Bright). Both Dome Lights go at the same time.
The ‘Dome Light’ that I have built over the ‘jump seat’ so there is one with a transparent or translucent spherical cap. This is, as in the real instance", mounted on an inclined mounting of the rear wall.
Dimensions of the real ‘Dome Light’ :
- Width = 81 x 81 mm
- Diameter white glass = 70mm
- Height white glass = 19mm
- Height of bracket where witglas behind to nip = 5.4 mm
- Total height = 19mm + 5.4 mm + 1.9 mm (thickness panel)
(Source : Michael G – Gallie)
PARTS
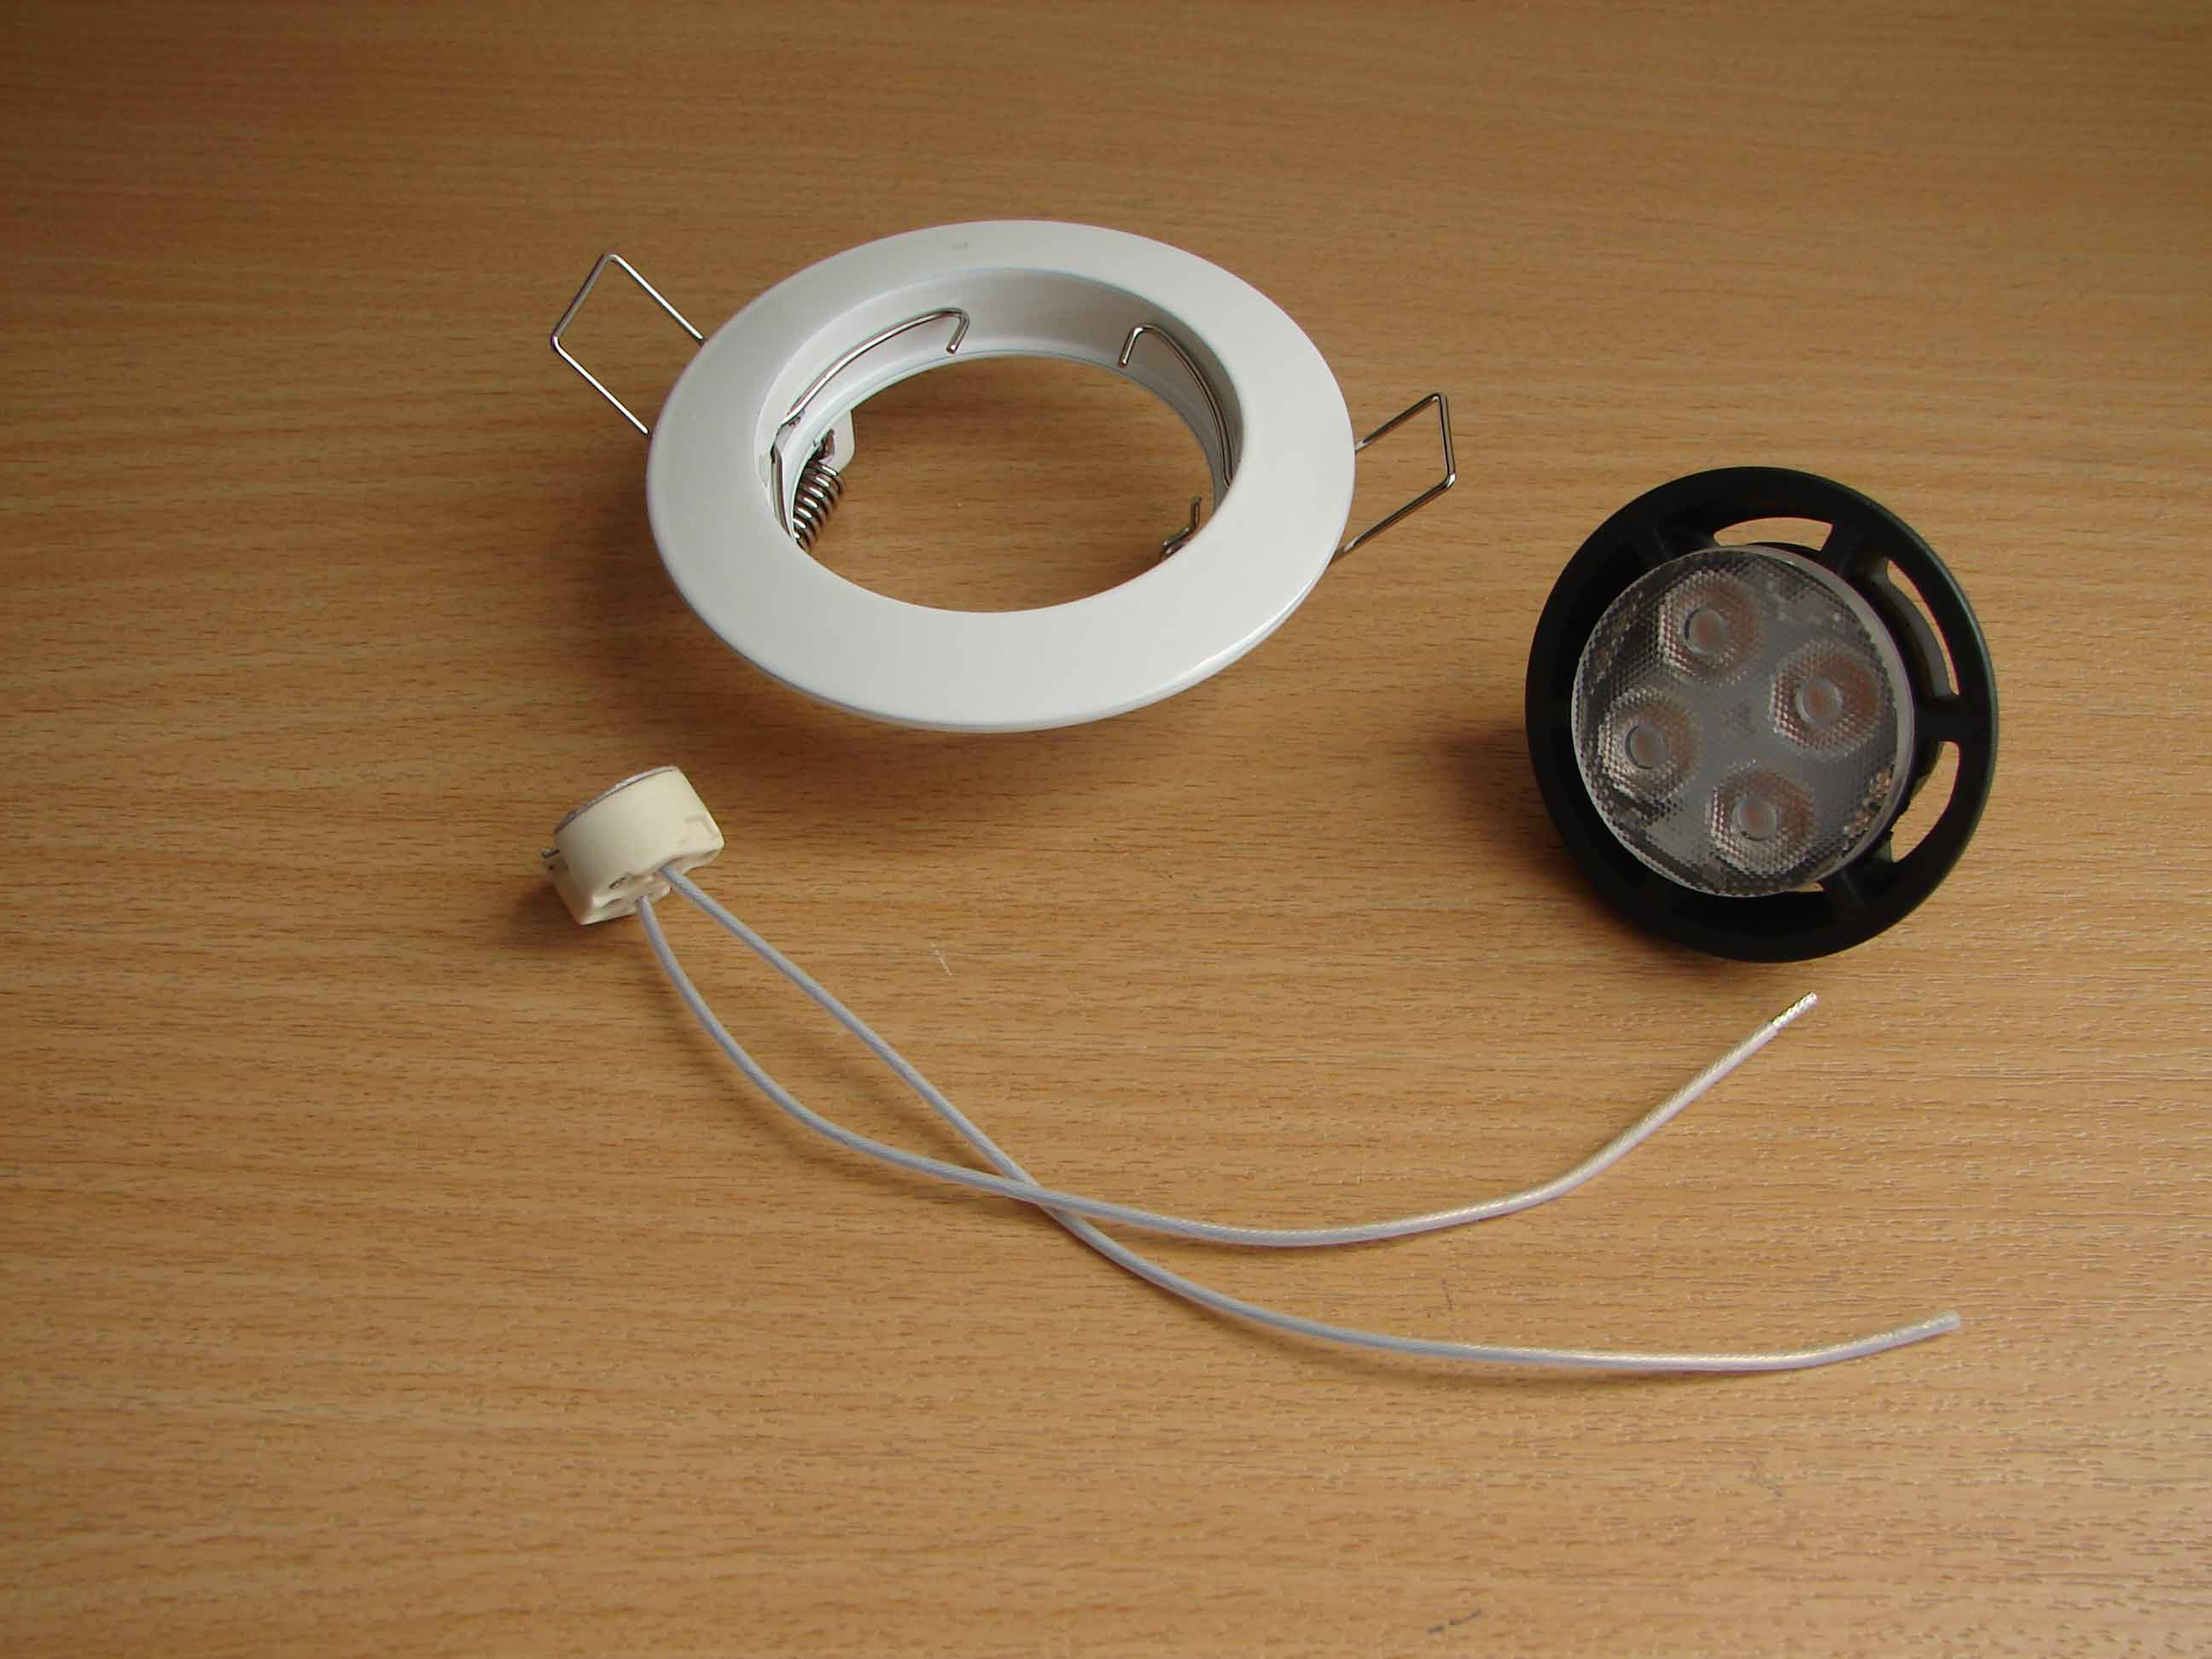
The ‘Dome Light’ I have patched together with parts that are to be found in most hobbyshops.
This ‘Dome’ Light is composed of the following components :
* Inbouwspothouder;
* Led;
The led spot with bulb holder I bought in a local electroshop. The led lamp (GU5.3 – MR16) is a regular light outlet (12V, 6,3 W >35W, dimmable, 36°).
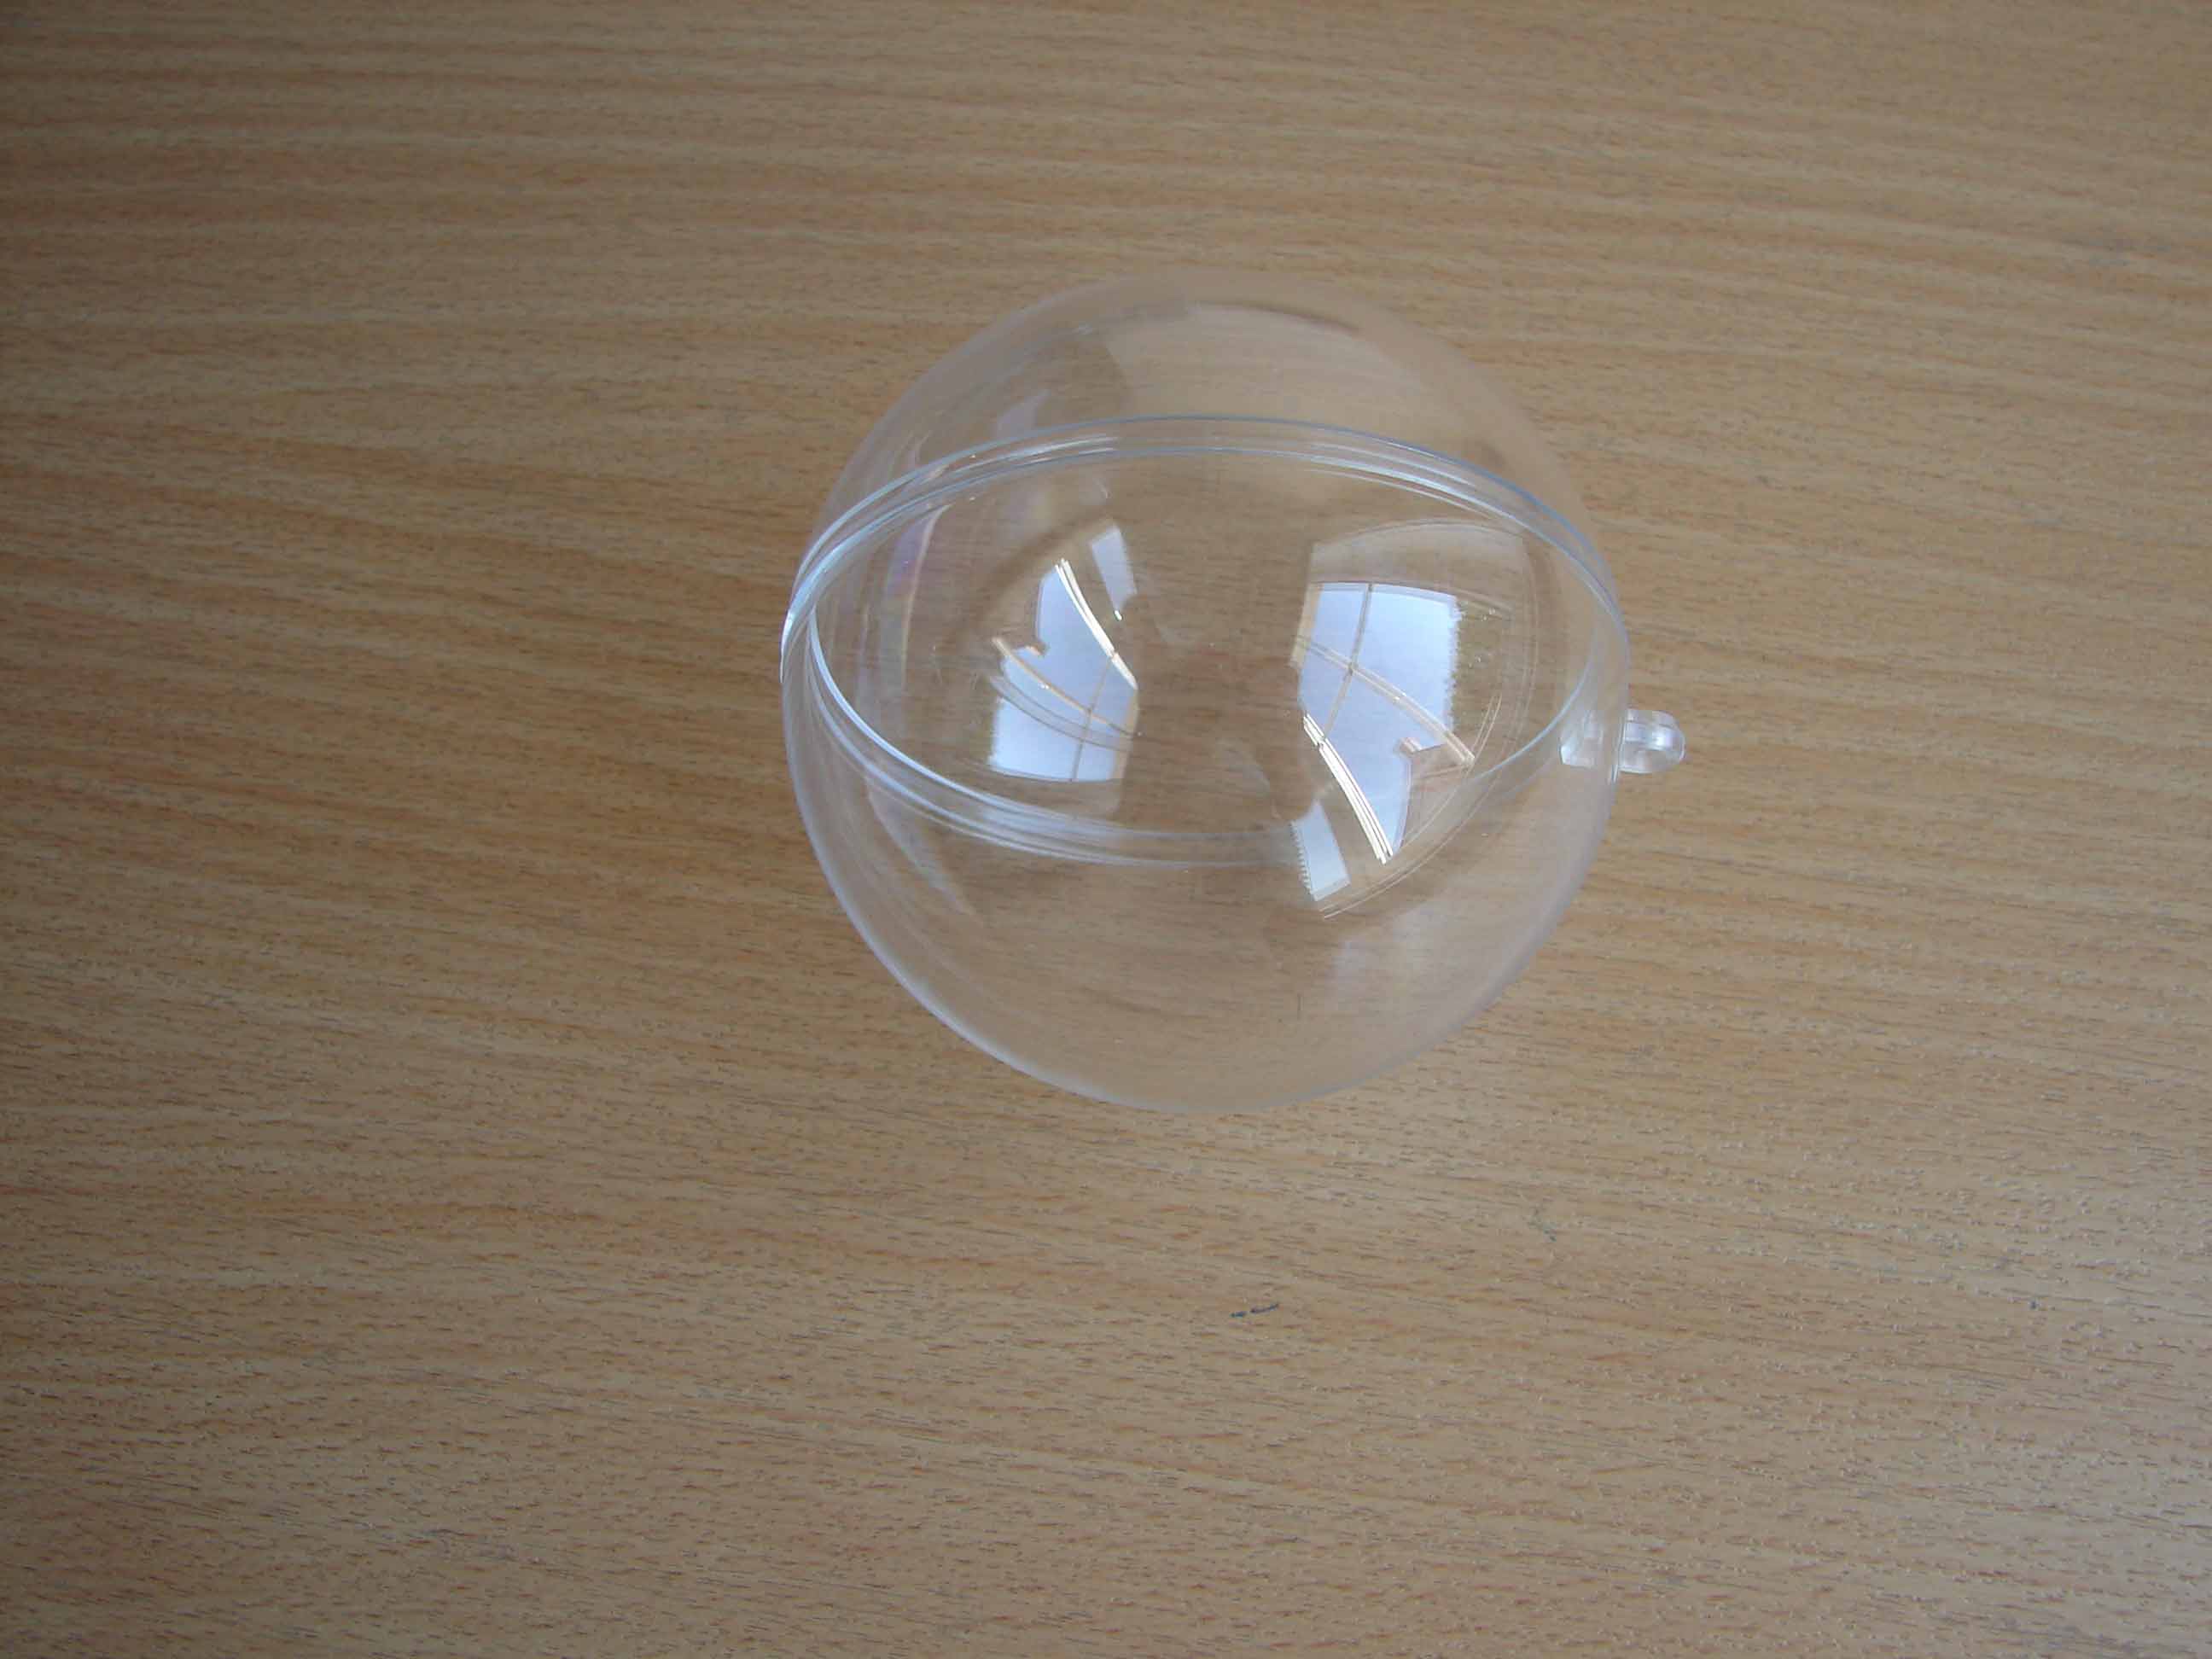
* Half a spherical shell;
This transparent, plastic bullets are sold in all AVA-shops in Belgium. You can use the bullet separate into 2 halves. These bullets are used to store anything, or for the hobbywereld. One can these bullets in various sizes.
Which is close to the size of the real version, I have a bullet bought with a diameter of 80 mm. This dimension of 80 mm is to take or to leave ... 🙂 (I'm depending on the bullets that are available in the AVA shop).
The convex curve at the original ‘Dome Light’ is also flatter. Also hard to find ...
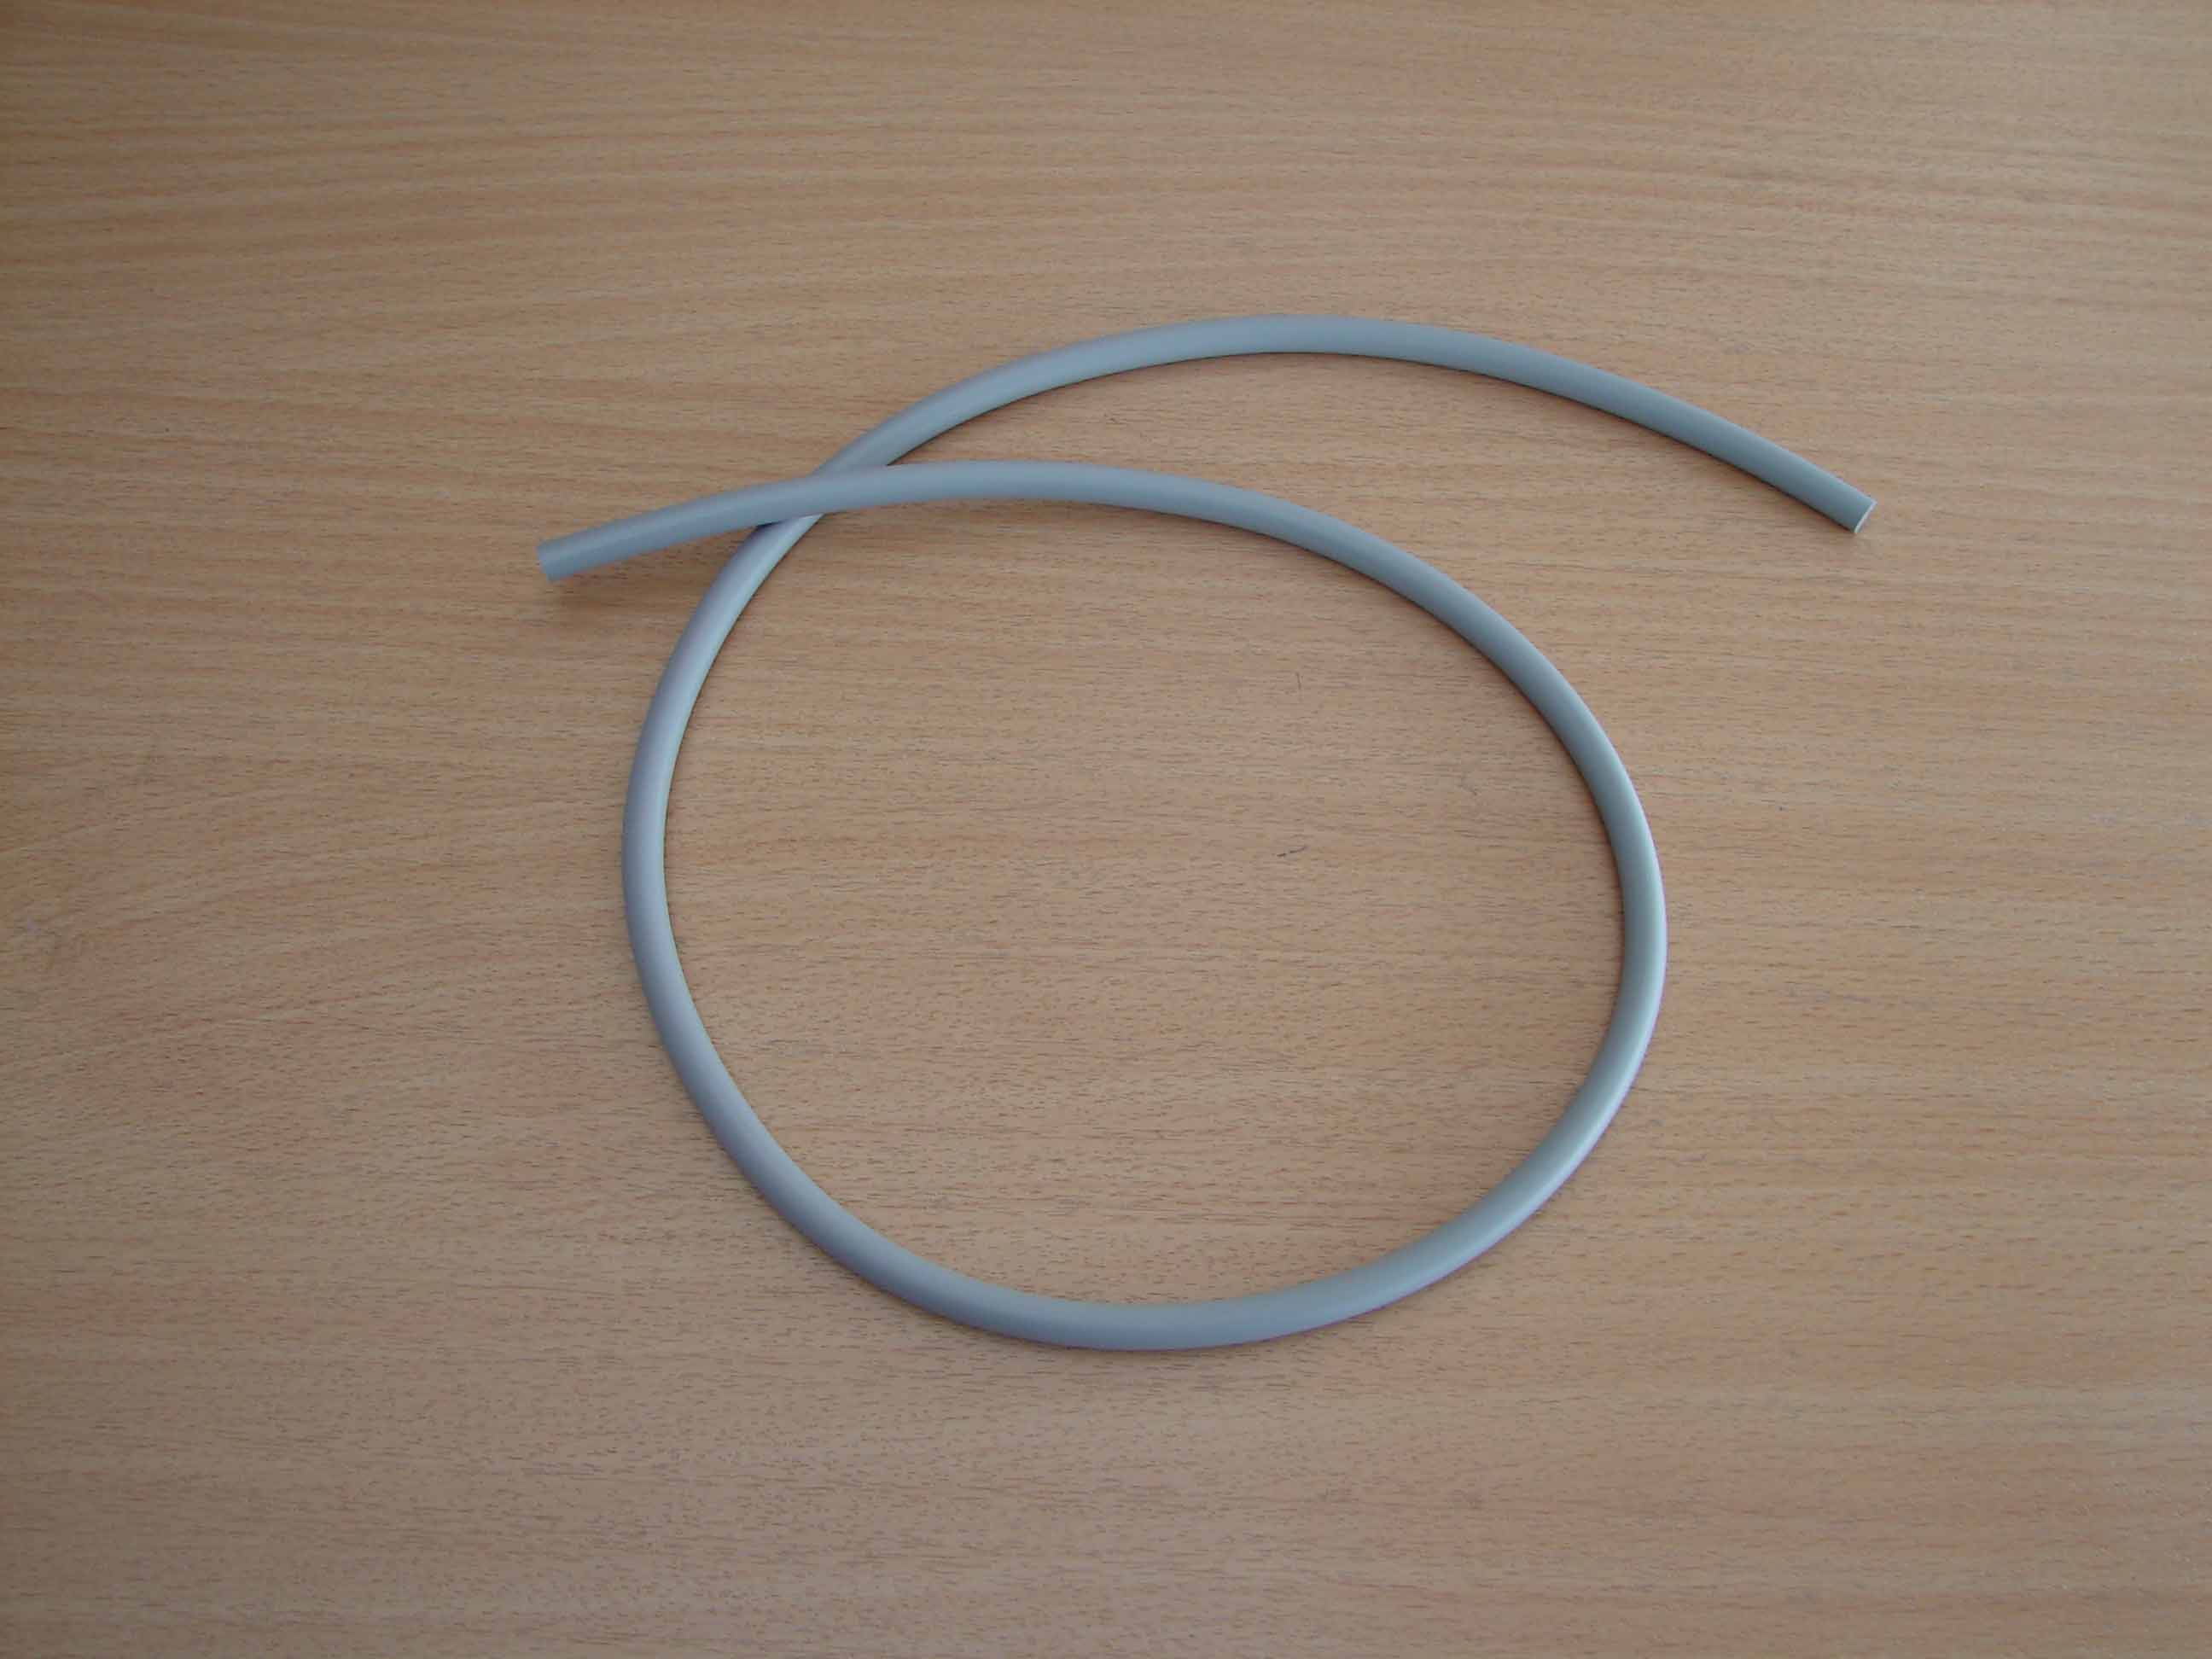
* Grey inlegpees for vliegenramen (screens);
The grey rubber ‘sausages’ are used to make the mesh in vliegenramen (mosquito nets) to terminals . The diameter is 6.6 mm.
For the ‘Dome Light’ they serve as an edging or frame.
* Aluminium panel with round cut-out;
The aluminium panel is made from a leftovers of a plate of 2 mm thick. This panel has a circumference of 90 mm x 90 mm
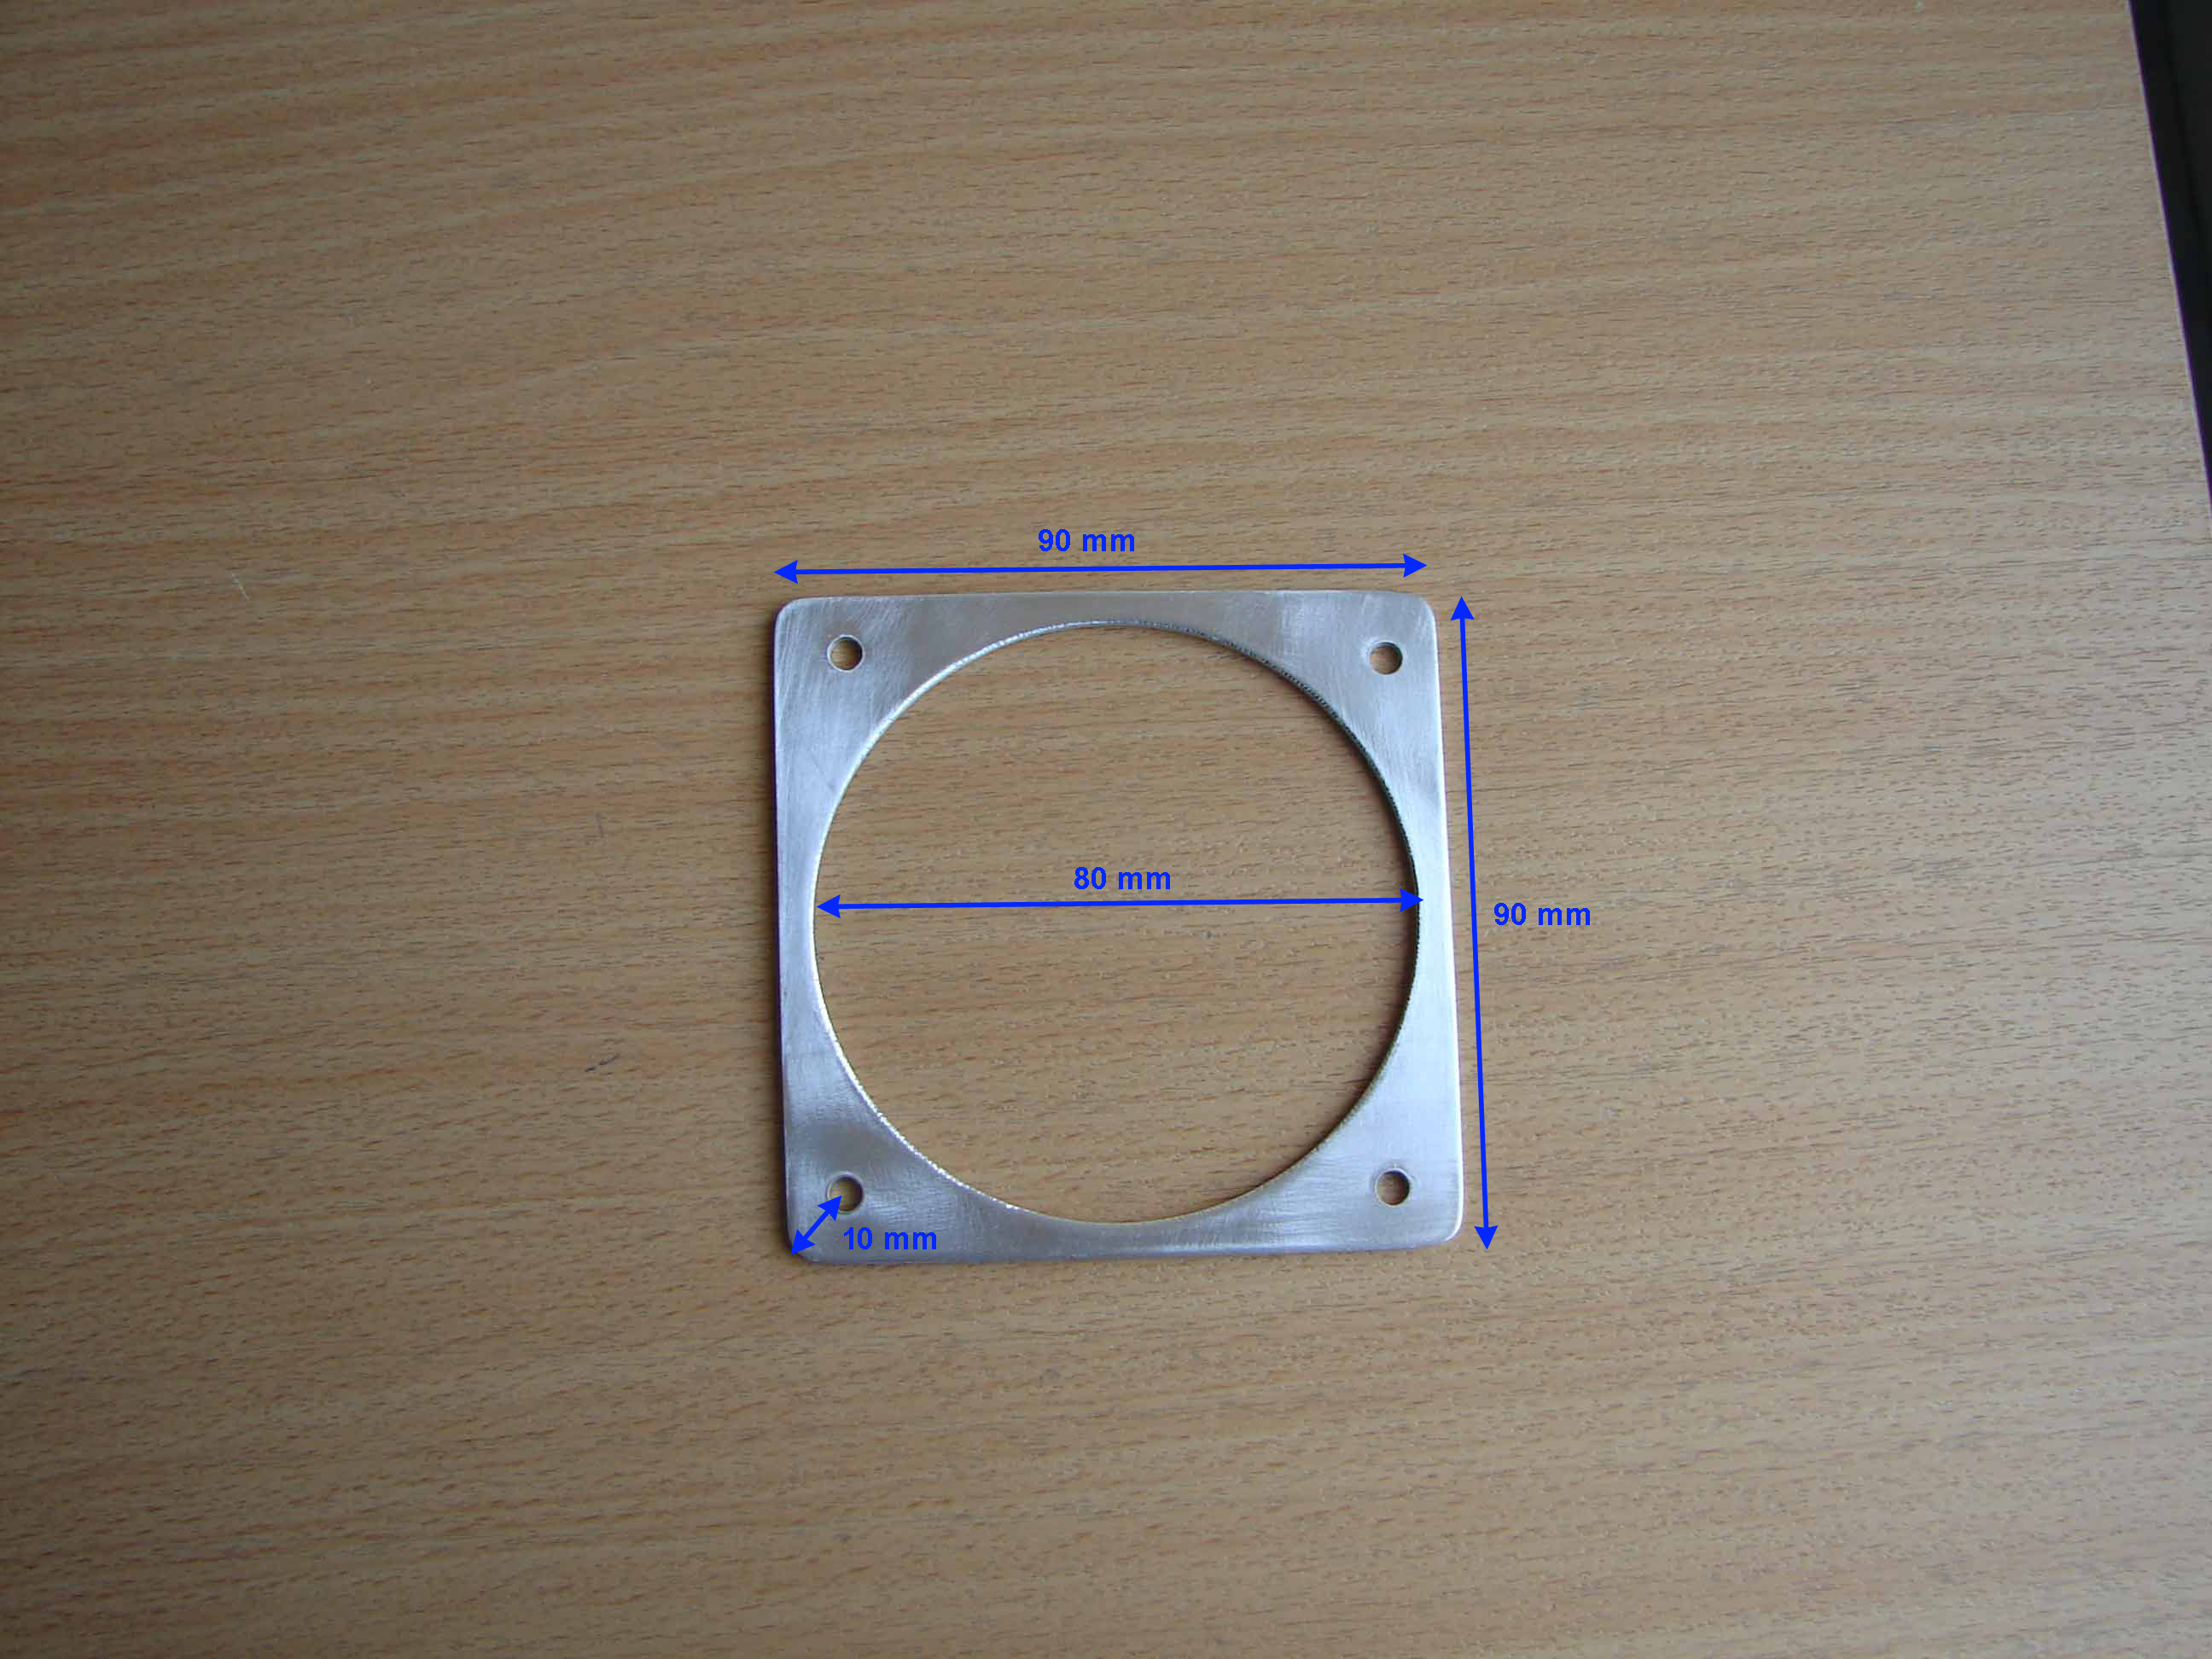
* 4 screws or bolts for the fastening.
Note. The metal retaining ring, as in the real ‘Dome Light’, we have omitted.
COMPOSITION
At the place where the Dome Light should come in the back panel (rear bulkhead) a round opening cut out of a diameter of 60 mm.
This happens in the square oblique mounting of the rear wall.
In this opening is the spothouder with led light posted. Through the back of the back of the lamp with the supplied cable connected to a power supply of 12V. This via the Dome Light switch on the AFT Overhead.


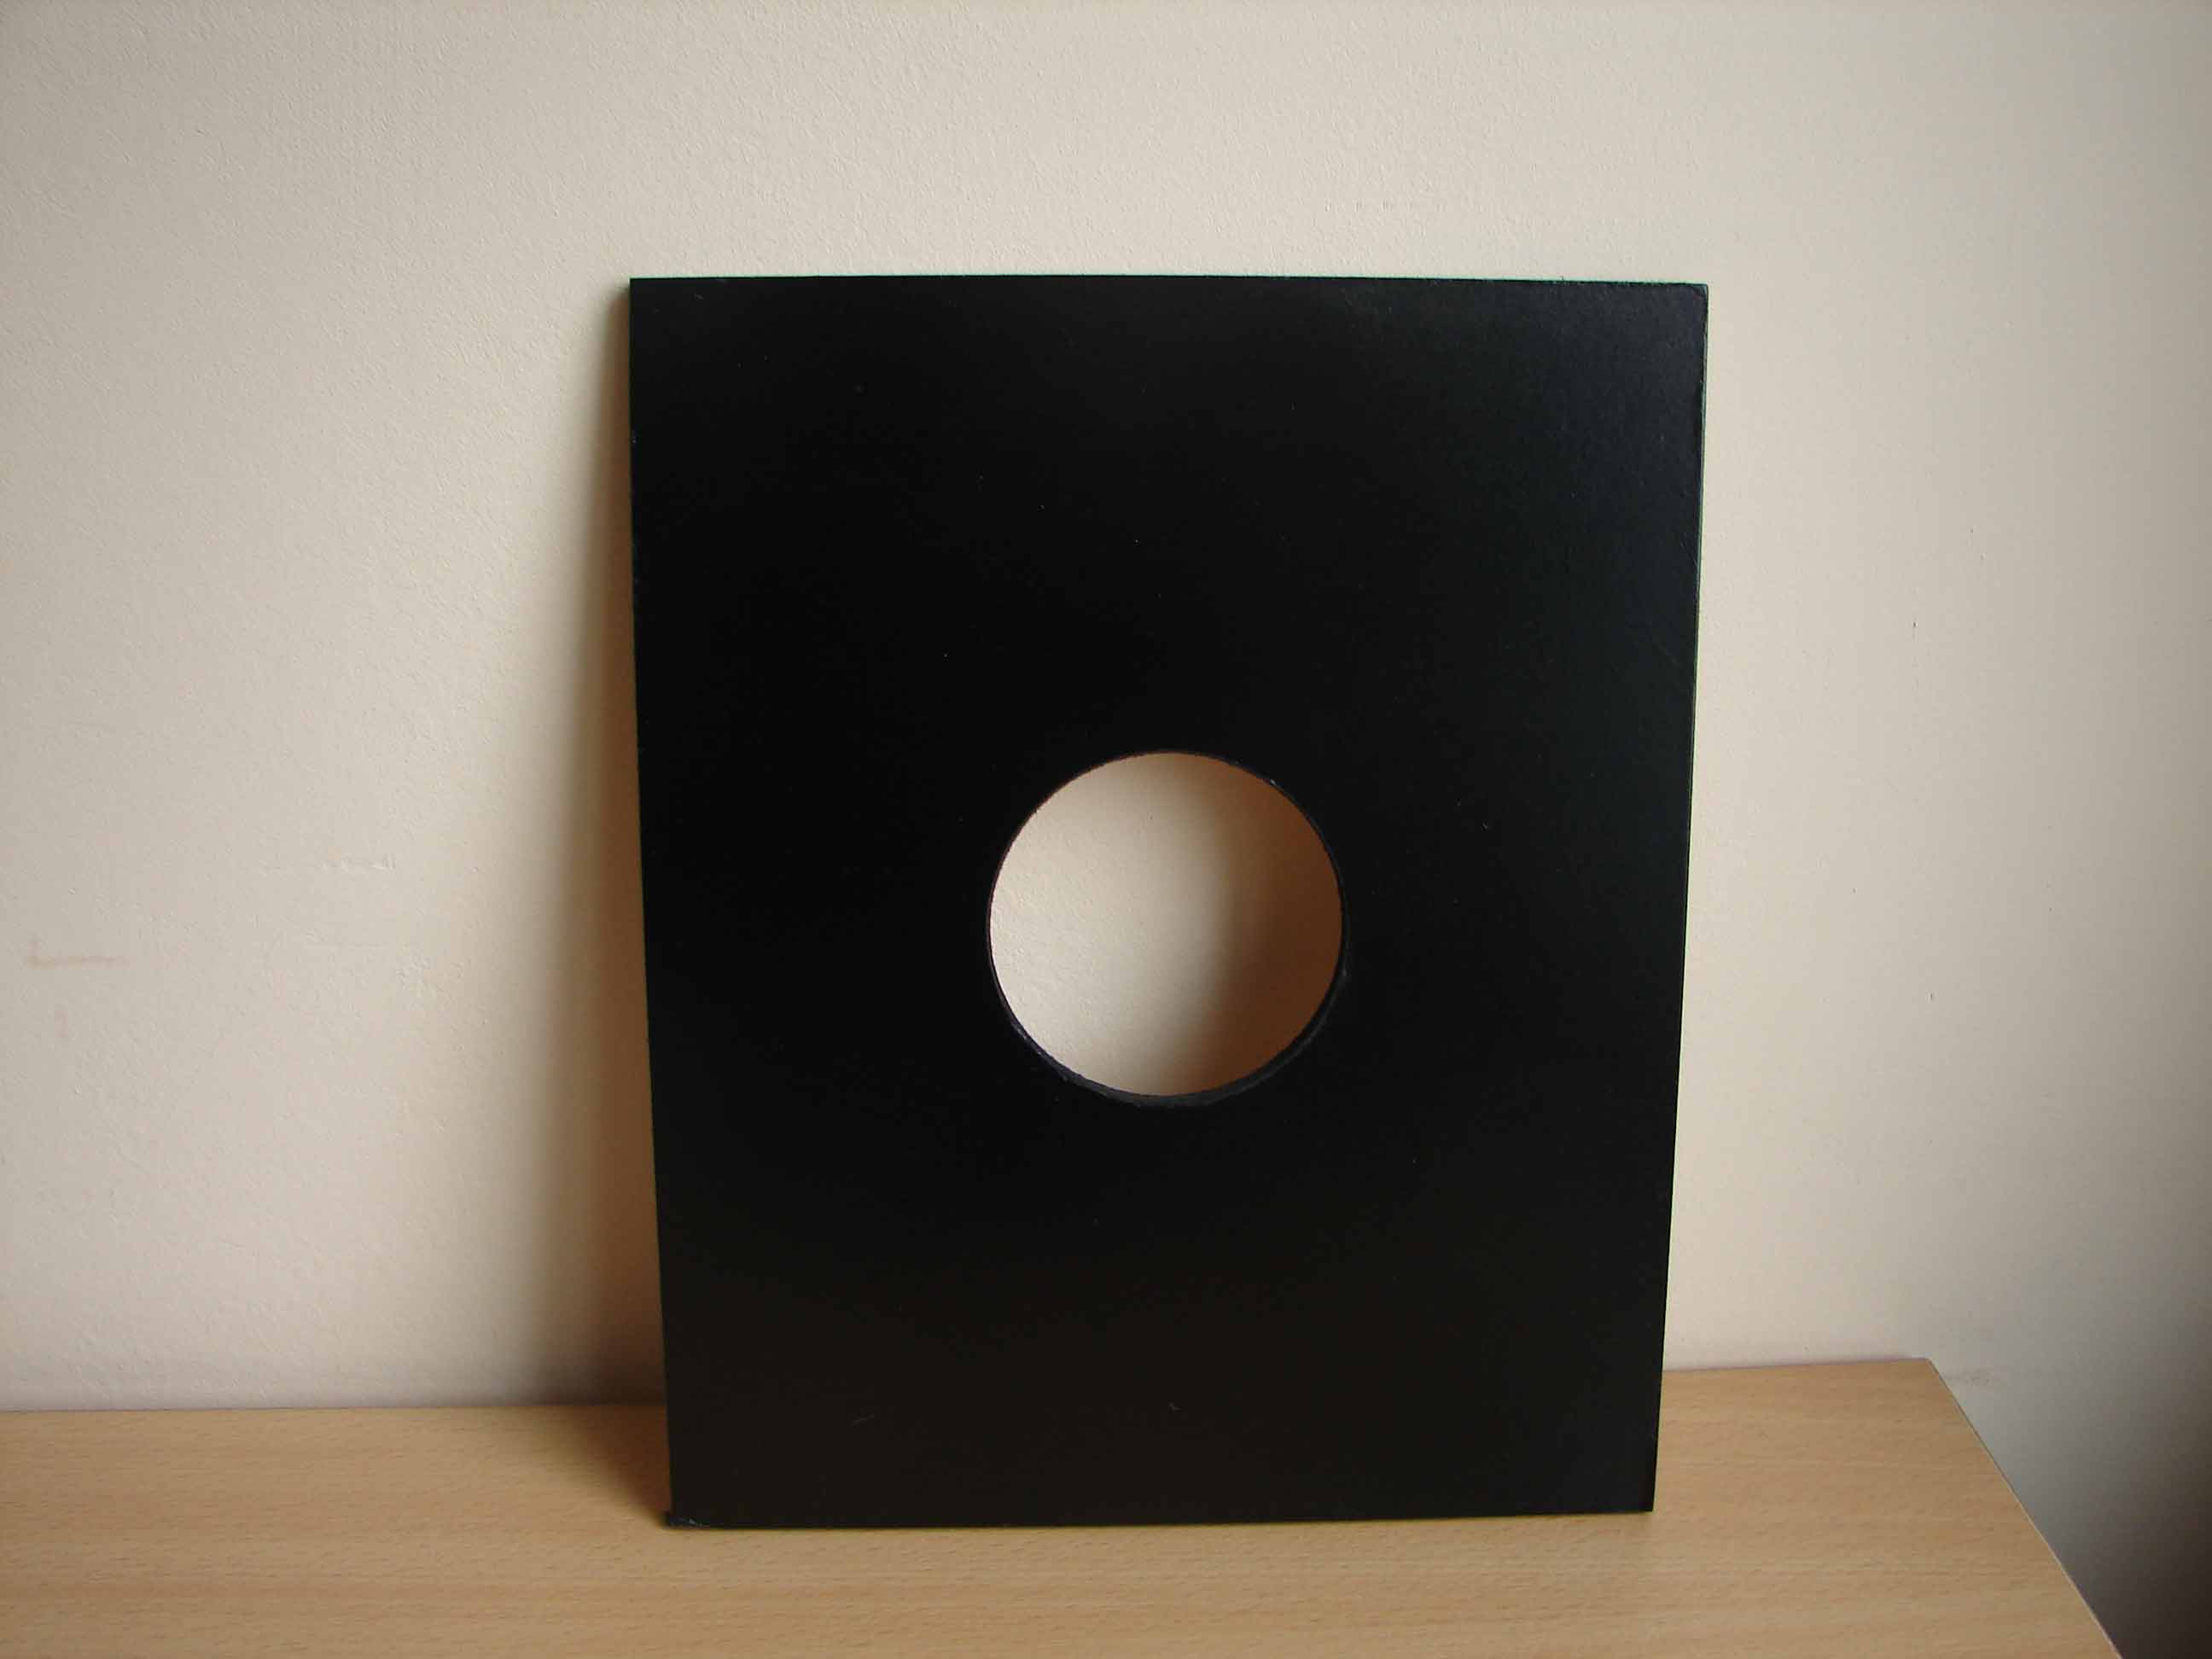
Then is the turn to the semi-transparent shell.
The transparent plastic ball from the AVA-shop it is composed of 2 halves which can be separate. One of the two halves we are going to use as a ‘lampshade’.
The plastic loop for the bulb to hang is carefully removed with a small saw.
The shell should not be painted white like the one on the FO side.
")
")
")
")
The next part is the making of the aluminum plate. First, is there a overschotje or leftovers of a alupaneel a opening turned of 80 mm. This work is carried out with a lathe.
Attention! The diameter of the two halves of the plastic ball have different sizes, i.e. a border for the inside and a border on the outside so they can click. So take the right half for the right opening ...


Afterwards, a square panel cut around the round opening, and this with sides of 90 mm.
On the four corners, and then 4 holes of 4 mm for bolts or screws for the fastening of the panel (with shell).
As the finish of the metal part are the 4 corners with a metaalvijl nicely rounded.
After the panel is sand and treated with a degreaser follows a layer of primer followed by a coat of Boeinggrijs (Satin). Also for the bolts or screws, of course.


As we good work delivered would be the half-ball in the right should fit into the round opening of the aluminum panel so that the half sphere well tense sitting in the opening. One can see the edge of the cap, to be sure, to glue against the edge of the aluminum panel.
The last part is the turn a rubber board on the edge of the shell and alu panel. We use a inlegpees that can also be used for the clamping of fly and mosquito in vliegendeuren (mosquito nets).
We measure the circumference of the circular shell with the inlegpees and cut it off with 5 mm surplus.
The inlegpees with a sharp knife in the length, carefully cut in half. This is precision work to the middle of the tendon. The string must remain and not be twisted! Attention! Dangerous for cuts!


The tendon is at the bottom with a double-sided adhesive tape that will stick so well. I did this with double-sided adhesive tape is used from the Aldi.
The inlegpees around the around the lampshade stuck. This happens without the inlegpees to stretch. The part that we have too much cut off.
The place where the 2 ends of the inlegpees each other touch, I have all the security still ‘welded’ with a drop of superglue.
")
 (Large)")
There rest of us, only the aluminium panel with round cap against the inclined extension of the rear wall to screws in which the inbouwspotje been previously mounted. Our ‘Dome Light’ is now operational and ready for use ...
")
")
")
OPBOUWBLOKJE HOUSING DOME LIGHT
The square block on which the dome light is attached is made out of mdf-panels. This building has a strange shape and it is recommended, therefore, that the photos of the real specimen to study.
This structure is glued and the corners and edges nicely rounded off with sandpaper.
The fastening at the back is done via 2 bolts at the rear. Through the opening at the front, one can easily with a screwdriver the square block against the back of the screws.
The edges at the back are filled with filler and gladgeschuurd.
")
")
")
")
")
")
")
")
")
")
")
")
")
")
")
")
")
")
")
Translated by Yandex.Translate and Global Translator


