Construction
 DESCRIPTION:
In the flight crew compartment door, it is pretty much the last part of my cockpit, I still have to build it. It's pretty much the icing on the cake ...
A lot of cockpitbouwers have not, in their cockpit, but the cockpit is nice to be close (literally and figuratively) and thought I had one to build it.
The first is that I have to be enough images to search what is out there, at the door only. I have also taken the help of a friend, the Ryanair pilot, who gave me all the deuronderdelen is a detail photo provided.
The size of the flight crew compartment door that is based on the size of the door opening where the door should be. It's as simple as that.
I've had this size, and compared with the measurements that are to be found in the MarkusPilot.com and they are in the real plane:
Height: 1890 mm)
Width: 560 mm
As I mentioned in my cockpit, that is not gangcompartiment-to-back you have, starting at the level of the circuit breaker panels to the door, it is the flight crew compartment door does not match up with the door on the actual aircraft. I have mine and so happy with the opening of the door, that is, i.e. with a height of 1720 mm and a width of 570 mm,. This is still the best.
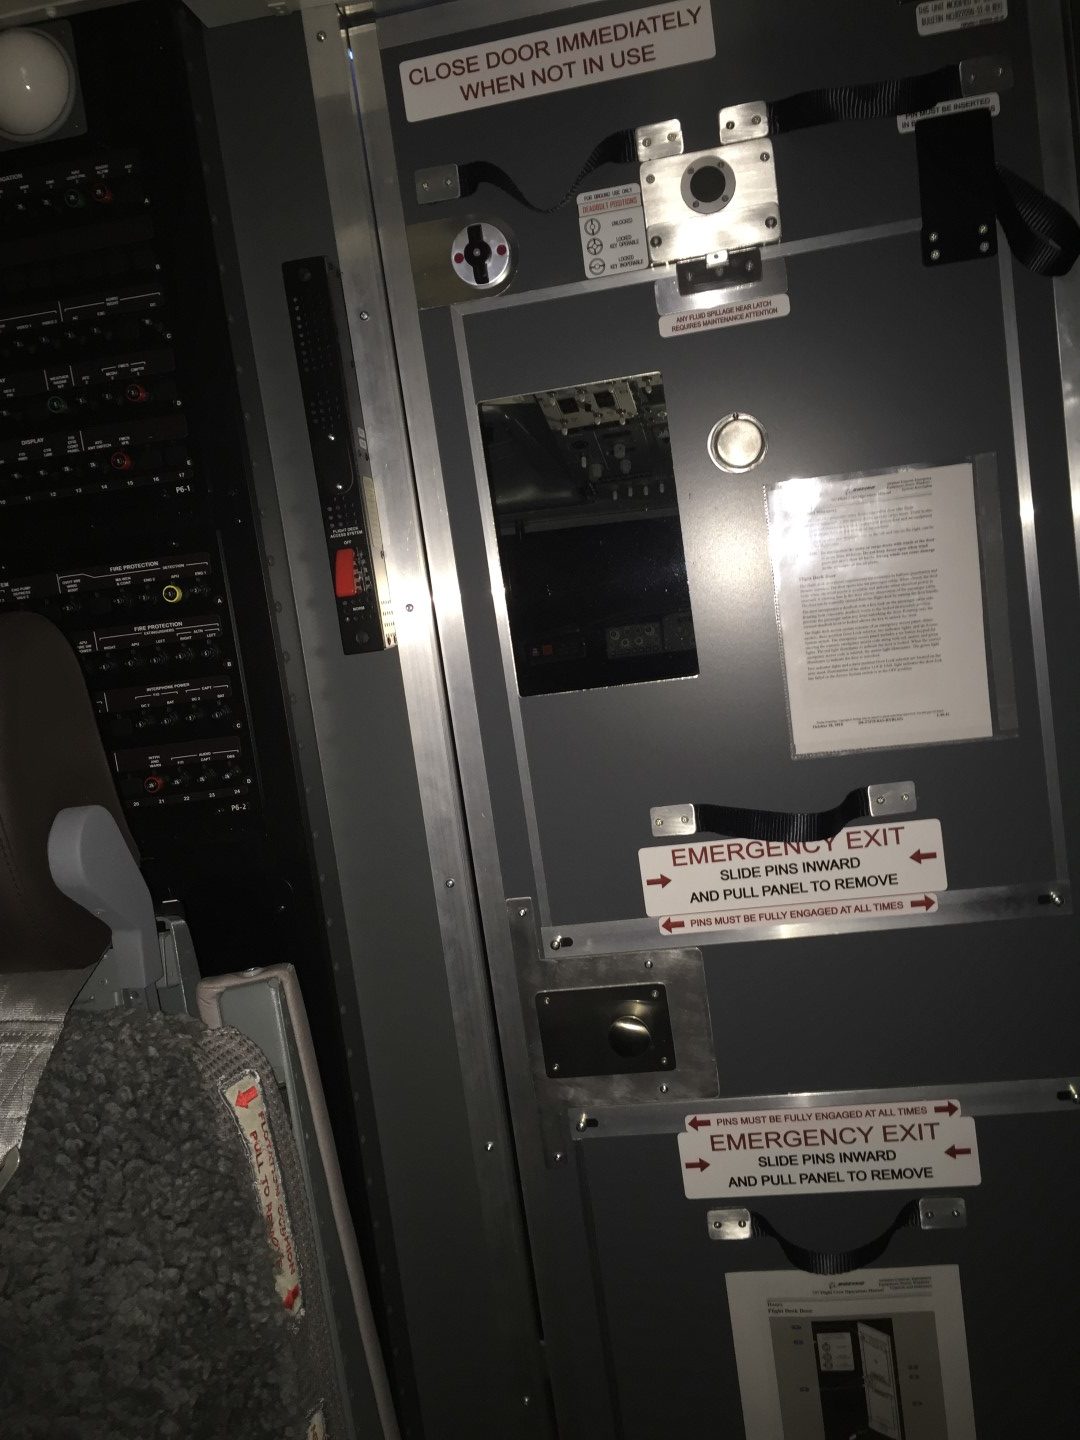
The other elements of the flight crew compartment door are in the Cabin to Access the System, "and the" Emergency Access panel". The explanation of the construction of the items on this page can also be found.
COMPOSITION OF FLIGHT CREW COMPARTMENT DOOR
- Panel out of Mdf wood 18 mm thick (thickness is a disadvantage of using Mdf is that it's quite heavy);
- Door panel out of wood, in white colour, 3 mm thick and the door is the same color as the buitenzijdes of the rear wall;
- Aluminium profile 25 mm, and 2 mm in thickness and a hole of 21 mm in order to have a frame around the panel;
- The thin aluminum slats 10 mm thick and 30 mm wide at the "blowout" panels to be simulated;
- Aluminum paneelje of 2 mm in thickness to provide the necessary flat parts are cut;
- The Aluminium panel 1 mm thick to provide the necessary flat and the parts to be cut and, if necessary, to the folds;
- 2 of the knobs for the door to open and close;
- Mirror:
- The black ratchet strap, 25 mm wide to make the tools to make it. The total length of 120 and 130 cm
- All the necessary nuts, bolts and screws to secure all of the planar elements to the selection;
- Decals and the engraved plates, with captions by;
- Deurvastzetter with the foot brake to get to the bottom of to confirm the order, the door may be fixed;
- Magneetslotje;
- A Mini-camera.
CONSTRUCTION
The construction of the flight crew compartment door, it is quite easy to name a few. Only the little parts, and there is some artifact in the at what time look on.
Very important! The size of the door panel out of mdf (or other wood) should be correct, i.e., the width and height to fit within the door opening, taking into account the thickness of the aluminum frame, and a couple of mm gap between the door and the door frames to the left, right, top, and bottom! So, that's what the precision of the measuring and sawing ...
With regards to the dimensions of the various parts at the door to come out, such as metal plates, handles and decals, these measurements are an estimate, calculated in accordance with the use of proportions and the schaalpercentages. They do not represent the actual dimensions.
The dimensions of these components may be obtained upon request.
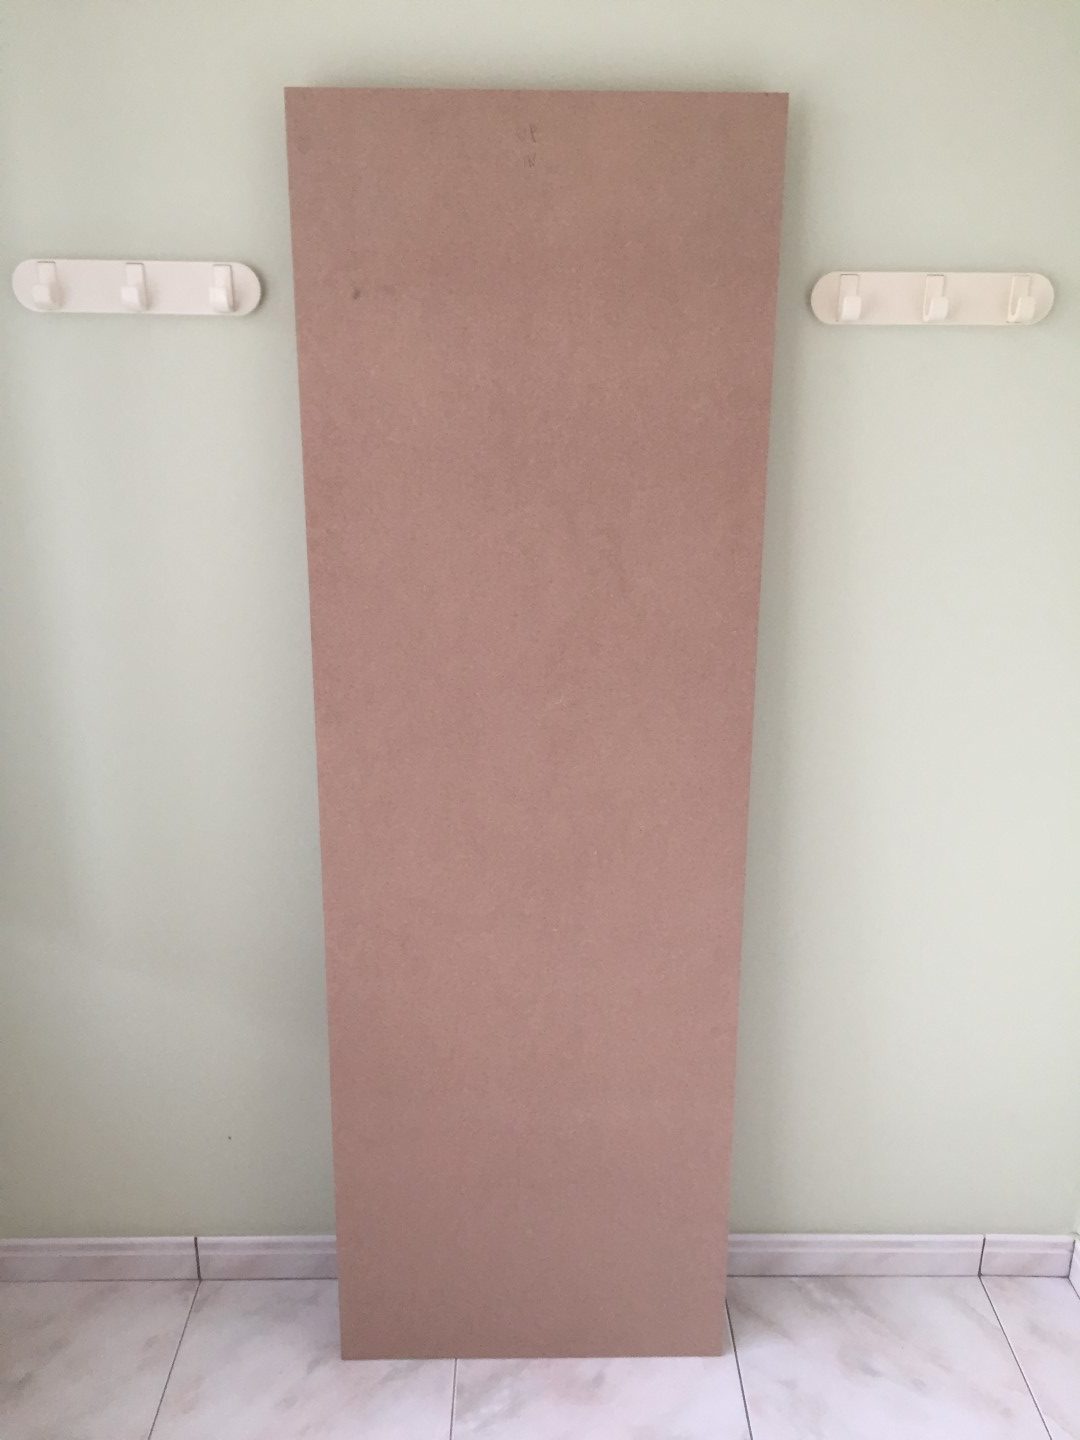
- At first I made a mdf panel to allow cutting in accordance with the size of the opening of the door, and, taking into account the thickness of the aluminum frame (2 mm), and a couple of mm gap between the door and the door posts;
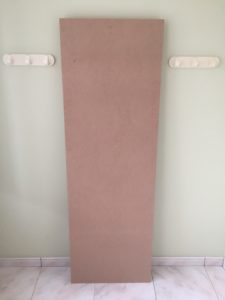
- I've got a hardboardpaneel of 3 mm in thickness, with one side in white), a saw of the same size as the mdf panel and hardboardpaneel, I have the mdf panel glued in with wood glue. The thickness of the door is more than 18 mm) and 3 mm (= 21 mm).

- You can have one side of the panel to paint, first a primer and then a couple of coats of lacquer in the Boeinggrijs.
- The thickness of the doors (mdf+ wood) might be just enough to get a aluminium U-profile, with the inner side of the 21 mm as well as under it, similar places. Clamp did not, however, be careful with the hammer should be in the frame over the top of them with hammer, so that the edge of the tread against the wood panel of the seat (think of it as the size of the opening+play).Now, we already have a door on the inside of boeinggrijze color on the outside and a white colour to the rear wall.


- The door, now we can all agree, measuring from the doorway of the dimensions according to your needs, and that the door is at a right angle;
- The next step is to adjust the hinge locations on the door jamb and the door. These door hinges are just plain hinges, with a length of 80 mm and a width of 18 mm.
The hinges should not have to be purchased, and you need to also be sufficient for the hinge to be mounted to support the weight of the entire door-to-wear. The door out of mdf wood, and has all the attributes to ensure it is of the light side. So it is better to be a little bit heavier to choose from scharniermodel, and not too little. 5 pieces in total.
I've also decided to have a scharniermodel with easy access to the door hinge and take-off.
I have the 2 hinges at the top, narrower bottom side (12 cm) than the others (45 cm) because of the deurbelasting is the highest at the top). The female part of the hinge on the door frame and the male part on the door. The door opens from the inside and to the right.


- If the door is hung and running, and everything in the dimension is correct, it is the most difficult part is behind you;
- The door can be found to decrease, and at the start of processing and the application of the various attributes;
- Box blowout panels: aluminum-pieces of 10 mm in width, and in the middle of the aluminum slats, 30 mm in width;
")
")


- Double aluminum panels, behind the door knob thickness of 2 mm.
- Door handles: The diameter of the piston is 4 inches, and can be purchased at Brico, Gamma, or any other do-it-yourself thing. To separate the shaft from the knob of the door with the button on the other side, on one side, and

")


")
")

- Deurvastzetter with the foot brake, bottom left: It or the Range or some other diy (do-it-yourself action;
- The 2 Aluminum blocks at the top and bottom left: this aluminum plates are of 2 mm in thickness. The bent plate on top of the bottom is 1 " thick.
- The black straps as a handle, that sit under the 2 aluminium plates. The strap or handle with an overall length of 23 inches. The aluminium plates to the handle and to attach to 2 " thick.
- The rear aluminium plate of the deadbolt in a reverse U-shape and thickness of 2 mm.
- It's a black aluminum plate at the top right of that should be combined to be 1 " thick.;
- The peephole on the inside of this, I just have a circular image that normally serves as the sleutelplaatje at the door, and then I have a bolt or O-ring is used to prevent the opening of the key is covered. The round piece on the top of the loophole is that you can remove, it is just a cover of the verfpotje, and this is held in place by a screw.
- The mirror is cut out from an old mirror that I had lying around;
- Around the picture with the 2 red circles: one around the sleutelplaatje of a regular door. The black, rectangular button, or the box is made out of wood;


- The round plates, located above and below the center of the rectangular blocks are made of plastic and are cut with a CNC machine (an engraver).
- Decal, and pictures with the captions: "that I have inscribed it to a local an engraver in the area. If you would like these decals to be ordered at the AWM laser engraving. They are on their pc's and should only be printed by their engraving machines (www.lasergravering.be – info@lasergravering.be).


- Around the picture of the front door: aluminum plate of 2 mm in thickness.
- As a finishing touch, I have to have the outer edge of the flight crew compartment door in a mini-camera,mini-camera.nlplaced in order to get into the cockpit, to the outside position. The images can be seen on the smart phone. This is a mini camera that can be cost-effective to find you on the Internet.


- In order for the door to close it when I'm in a magneetslotje be used.


")
")


")


")
")


Note. For a general description of the functioning of the flight crew compartment door, can be found at the following link:
https://www.flightdeck737.be/hardware/platform/cockpitdoor/omschrijving-en-werking/
THE CABIN AND ACCESS TO THE SYSTEM
The Cabin Access System, a black rectangular block on the left-hand side of the flight crew compartment door. In this module, there is a toggle switch with a red guard (guard).
When the switch is in the STANDARD state, it is in the flight crew compartment door, activated and closed through the solenoid switch. Inside, under the black cover, there is a module to set the required chime sounds to let you hear it. Further, in the inside of the module, various settings such as the password, time, etc.).
This Cabin Access to the System in the cockpit is a replica (dummy), and, therefore, is not in operation. It should only be used for the game ...
The dimensions, such as in the case of the flight crew compartment door, and so on, estimate, calculated in accordance with the use of proportions and the schaalpercentages. They do not represent the actual dimensions.
It is, therefore, to approach the ...
As a ‘formwork’ or the context, I took a sheet of plywood blocks to use on top of one another, are glued together, and where all around the long aluminiumplaatjes to be confirmed. The oblong-shaped aluminum plates of 2 mm thickness and provided with the necessary openings for the mounting of the switch and the holes for the sound to be.
In the aluminium panel at the front, I also have the top and bottom holes will be drilled as you can see, it is the real one. Which holes do I use the CAS module to the back-to-attach with a few screws.
The upper and lower portions of the CAS-module are sealed with a two, small, rectangular, glued on aluminium plates of 1 mm thickness.
After a paint job is in the primer and then the black color, I used the CAS-module and equipped with all the necessary stickers. The decals I designed and printed out.
The dimensions of these components may be obtained upon request.
Note. For a general description of the operation of the Cabin and Access to the System, is to be found at the following link:
https://www.flightdeck737.be/hardware/platform/cockpitdoor/omschrijving-en-werking/


THE EMERGENCY ACCESS PANEL
The Emergency Access Panel located on the outer edge of the flight crew compartment door (cabin side).
This is a white panel (it looks like a remote control with 6 buttons and the numbers (1 to 5), and an "ENTER" button. At the top there are 3 lights (red-amber-green).
By using the correct code key can be used in an emergency from the outside of the door before you open it.
It also serves as a sort of ‘doorbell’ for the Flight Crew to contact.
This Emergency Access Panel in my cockpit, it is a replica (dummy), and, therefore, is not in operation. It is also intended only for the realism of the game ...
The dimensions, such as in the case of the flight crew compartment door and, thus, an estimate is calculated in accordance with the use of proportions and the schaalpercentages. They do not represent the actual dimensions.
It is, therefore, to approach the ...
The advantage of this panel is quite simple and easy. A block of wood from the mdf board of 12 mm thickness, and paint it in white, satijnkleur.
To the front is a white kunststofplaatje together with the same dimensions as the sheet of plywood is square.
In the box are made of plastic and engraved with the figures glued + ENTER. In the orange AVE-heading is to be printed.
The frontplaatje made of plastic, and decals, with the embossed figures of a local, an engraver (www.lasergravering.be – info@lasergravering.be).
The 3 lights (red-amber-green) in the simulation, I have 3 small holes, one under the other drilled into 3 studs with round heads are to be installed. At first, the round of the cups (red, amber and green in the painting.
It gives you an idea of the order in which the lights are on in reality as well, in order to give in the event of a cockpitbezoek ...).
Note. For a general description of the operation of the "Emergency Access Panel" that can be found at the following link:
https://www.flightdeck737.be/hardware/platform/cockpitdoor/omschrijving-en-werking/


Translated by Yandex.Translate and Global Translator


